
Challenge-ing Times AECP Level 1 Challenge
As you know, I’m in the Altenew Educator Certification Program. I’ve completed my classes, and now it’s time for the Final Challenge! And it was a good one! Design a cohesive set of masculine cards, another of feminine cards, use 3 lessons from the Level 1 classes, and the most challenging – one recycled item!! That’s not daunting at all!!
First, I chose my techniques/classes:
Easy Ink Blending Techniques
Celebrations: Stencil Techniques
Easy Die Cutting Techniques
Let it Shine
I never usually sketch out my card ideas, but this time I really needed a plan! You can see (assuming you can read my scribbling) that I decided to make similar sets of cards using one common color, and then adding a masculine/feminine ink. I chose Eastern Sky Crisp Die Ink as the common color, then Warm Sunshine Ink for the masculine, and Pinkalicious Ink for the feminine ones. I chose them because I was assured to get a good color when I blended them together. I also chose to use the Garden Trellis Cover Die in different ways as another common item to tie the card sets together.

Card 1 - Die Inlay – I call this card “what was I thinking?”
I started by ink blending on two 4.25 x 5.5 panels (or so I thought). I was very happy with the blends of the blue/pink and the blue/yellow combinations. If you’ve been reading my posts, you know that ink blending is not my favorite, but the Altenew Ink Blending Tool make it so easy! Now it’s my favorite thing, which turns out to be a good thing, but more about that later.

My grand plan was to cover the blended panels with the Garden Trellis die cut from white cardstock.

But as you can see, the yellow panel was TOO SMALL!
I ended up cutting the blended panel with the same die, which gave me really pretty confetti. But kinda broke my heart a little. I also cut the die twice with plain white cardstock.

So much confetti!
Then I started working with the inlay (this is the ‘what was I thinking’ part!). I chose the color pieces carefully to maintain the look of the blended panels, then placed the white pieces in the empty spots. I also decided to pop up some of the color pieces for added interest – this took 2 hours. There’s a lot going on, so I knew I needed a simple greeting. I turned to the Label Love stamp set for its bold, simple designs. I chose “you inspire me” because it was a greeting appropriate for men or women.

Card 2 – Ink Blending/Die Overlay
Now I started creating the card I attempted to make the first time. I ink blended another 2 panels (I measured them this time), using the same colors as before. I cut the Garden Trellis die from white cardstock (twice) and glued it over the blended panels. Now it needed a greeting. Something that would ‘pop’ over the busy background. My first thought was the Happy die. I had a poor thought about using it over a black layer.
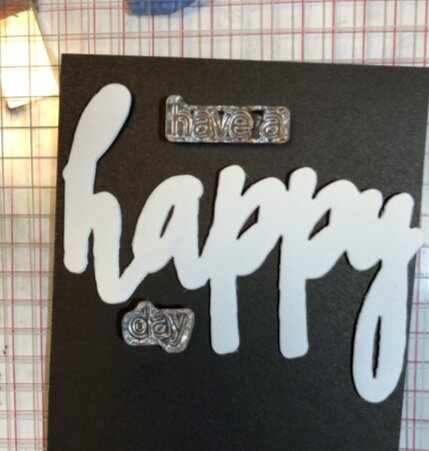
I gave that up pretty quickly. And went in a different direction. I cut Happy from a few layers of white cardstock and glued them together for some height, added a layer of black for a drop shadow and glued them over a square of vellum. The word stood out on its own, but I wanted to set it off from the background a little, so the vellum was perfect! The advantage of layering a large image over vellum is that you can hide glue behind the image! Glue usually shows on vellum, so this is a perfect way to get all the sticky, and none of the mess!

Card 3 – Embossing with a Die
From the moment I saw this die, I knew I would love to see it used to emboss a background. Truth be told, I’d never done this before, but it was worth a try. It worked perfectly! I was so excited!

Now to embellish! I had just received the new Watercolor Garden layering die set, and I was dying to try it out – and I wanted to keep to my challenge and use it on both cards. So, I used the flower on the feminine card. I used the Shades of Purple paper pack, thinking that the purple would pick up the color blend of the blue and pink. I cut and glued everything together, and started to get them positioned. Once I was happy with the layout, I turned to the crafter’s friend Glad Press ‘n’ Seal to hold the pieces in place while I glued them down.

Everything is held in place before I glue them down
I die cut the leaves from Warm Sunshine and a blue cardstock I had on hand and used those to carry the blue/yellow color scheme on the masculine card.
I needed a simple greeting, so I turned to the Sentiment Strips stamp set, stamped it in Clear Embossing Ink, and embossed it with Pure White crisp embossing powder. I used my Mini Blossom die cutting machine and the Sentiment Strips Die to make my greeting strip – so easy!

Card 4 –Stencil Techniques – Let it Shine
Yes, there is a Garden Trellis stencil, but I didn’t want to cheat or take the chance that the die and the stencil weren’t an exact match – so I used the die and a piece of acetate and cut my own stencil.

I taped the stencil in place - I didn’t want it to move!
Using the same 3 colors, I ink blended through the stencil. I trimmed down the inked panels to 4 x 5.25 to make a frame around the images (and remove the places where I had tape). I looked at it for a bit and realized the one thing missing was some sparkle and shine! I had the gold washi tape bundle with a few different widths, so I ran 3 thin strips (remember about using odd numbers?) diagonally across the card. I decided to use the Bold Thanks die set, but I didn’t want to get out my gold paper, and I wanted the gold on both to be the same, so I placed the wide gold washi tape from that same bundle on a strip of cardstock, and cut the word from that.

I cut the bottom die from another piece of vellum, layered the gold letters over it, and I had a pretty greeting in the same color gold as the gold stripes.

The Finishing Touch – Recycled item
The last part of the Challenge was to use a recycled item, so I decided to use a box from some mini-lights to hold my cards. I wasn’t quite sure what to do with it, then I decided to use some 12 x 12 paper from the Live Your Dreams paper pack and cover the box. I will never have a career in engineering, but I was finally able to cut and score the paper to wrap the box.


Once I had the box wrapped with the patterned paper, I realized the top edge was very rough and unfinished, so I took gold washi tape (again) and used it to finish the edge.

It needed a little more, so I looked around my studio, and found some chipboard circles I could use as gift tags. I got my stencil out again and decided to use it along with Eastern Sky ink onto a palette, then added Embossing Paste and mixed them together until I had a shade I liked. I repeated the process with Pinkalicious ink. Now I had two textured gift tags!

I needed a way to present the cards and boxes, so I decided to use small clear gift bags. I tied the feminine set with a white & gold ribbon, and the masculine set with twine. I attached the gift tags to the ties – and done!!

The finished projects!
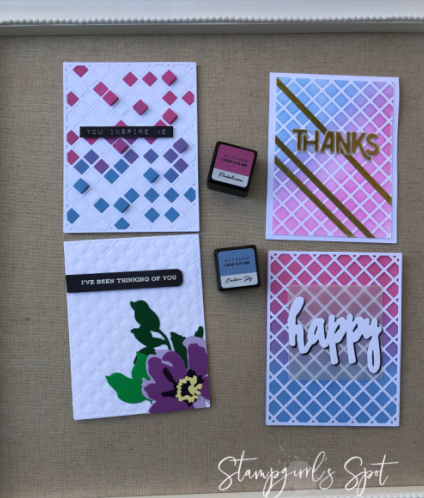
Feminine Card Set!

Masculine Card Set!

All the cards!!
This was a great challenge – and it was, I guess, challenging! I was pleased that I held myself to my goal of only using 3 colors, and one die. I’m not sure I’ll ever attempt a die inlay again but live and learn!
If you’ve made it to the end of this point, thank you for staying with me and I hope you’ve enjoyed it!
I’d love it if you left me a comment and let me know what you liked (and disliked) about the card set!
Until next time, stay well and be kind -
XO
Sue